The purpose of this post is to understand and implement the z-buffer algorithm to solve the visibility problem. The visibility problem is the problem of deciding which elements of a scene are visible and which are hidden.
Introduction to Rasterization
Rasterization transform an image from a vector graphics format to a raster image(composed of pixels and dots) for output in a monitor, printer or for storage(bitmap file format). Rasterization is the most popular technique for producing real-time 3D computer graphics. Compared with other rendering methods(such as ray-tracing), Rasterization is extremely fast.
The Z-buffer Algorithm
The idea of the Z-buffer algorithm is to use a 2D matrix(z-buffer or depth-buffer) to store the depth of the closest object to the observer’s view. When a object is rendered, the depth of a generated pixel(z coordinate) is stored in the depth buffer. If another object must be painted in the same pixel, the depth of the new pixel is compared with the stored depth, if the new pixel’s depth is closer than the stored depth then the value of the pixel in the z-buffer is overriden. The z-buffer will allow to reproduce depth perception correctly.
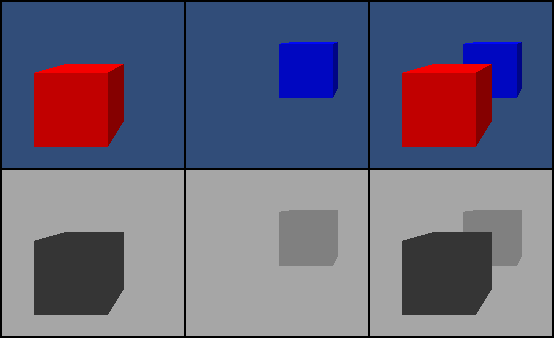
The previous example shows two objects in a 3D-space transformed to a 2D projection-plane. The second row shows the values of the Z-buffer matrix and how the Z-buffer algorithm process overlapping.
An important characteristic of the z-buffer is the granularity. The granularity of a z-buffer defines the scene’s quality. A 16-bit z-buffer could result in artifacts(called z-fighting or stitching) when two object are very close each other. As higher z-buffer size, better image quality will be rendered, avoiding artifacts but the problem cannot be entirely eliminated without additional algorithms. 24-bit or 32-bit Z-buffer is more accurate. A 8-bit Z-buffer is almost never used because it has too little precision.
Pseudo-Code
The following pseudo-code shows how Z-buffer algorithm works. The algorithm receives as input the list of polygons Plist = {P1, P2, …, PN} and return a color array COLOR(x, y) representing the color for each pixel in the projection plane.
- Given: A list of Polygons Plist={P1, P2, …, PN}
- Output: A color array
- Initialize:
- zBufferArray(x, y) = maxDepth -> array of depths for the projection plane.
- colorArray(x, y) = backgroundColor -> array of colors for the projection plane.
- Begin:1234567891011FOREACH polygon IN Plist DO {FOREACH pixel(x, y) IN polygon DO {CALCULATE zDepth OF polygon AT (x, y)IF (zDepth < zBufferArray[x, y]) THENzBufferArray[x, y] = zDepthcolorArray[x, y] = color AT polygon[x, y]END IFEND FOREACHEND FOREACHRETURN colorArray
The Implementation
The Z-buffer algorithm was implemented using the javascript library P5.js. The algorithm iterates over an array of polygons, each of them with a matrix of pixels representing the color and depth of each pixel. So, each value in the matrix is a quadruple representing the three main colors in RGB format(Red, Green, Blue) and the last item of the quadruple is the depth of the polygon for that pixel. As a result, the implementation return a matrix of colors representing the color for each pixel in the representation view which is shown to the viewer.
|
|
Results
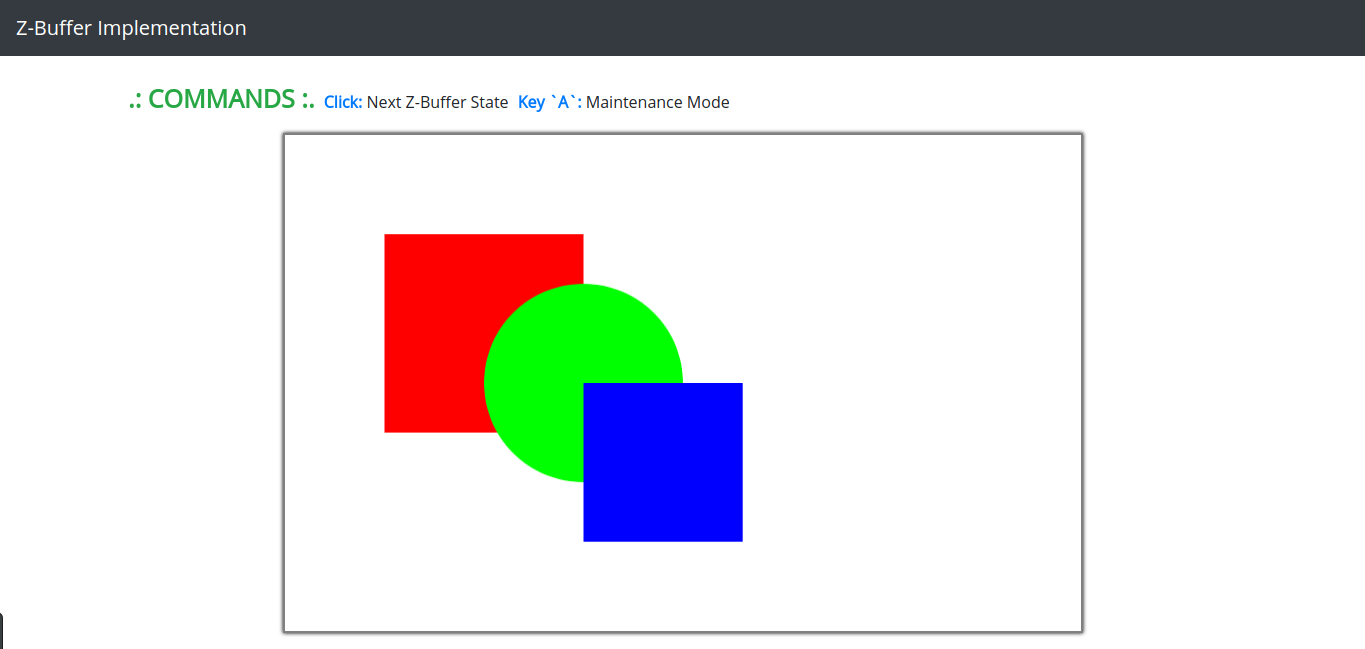
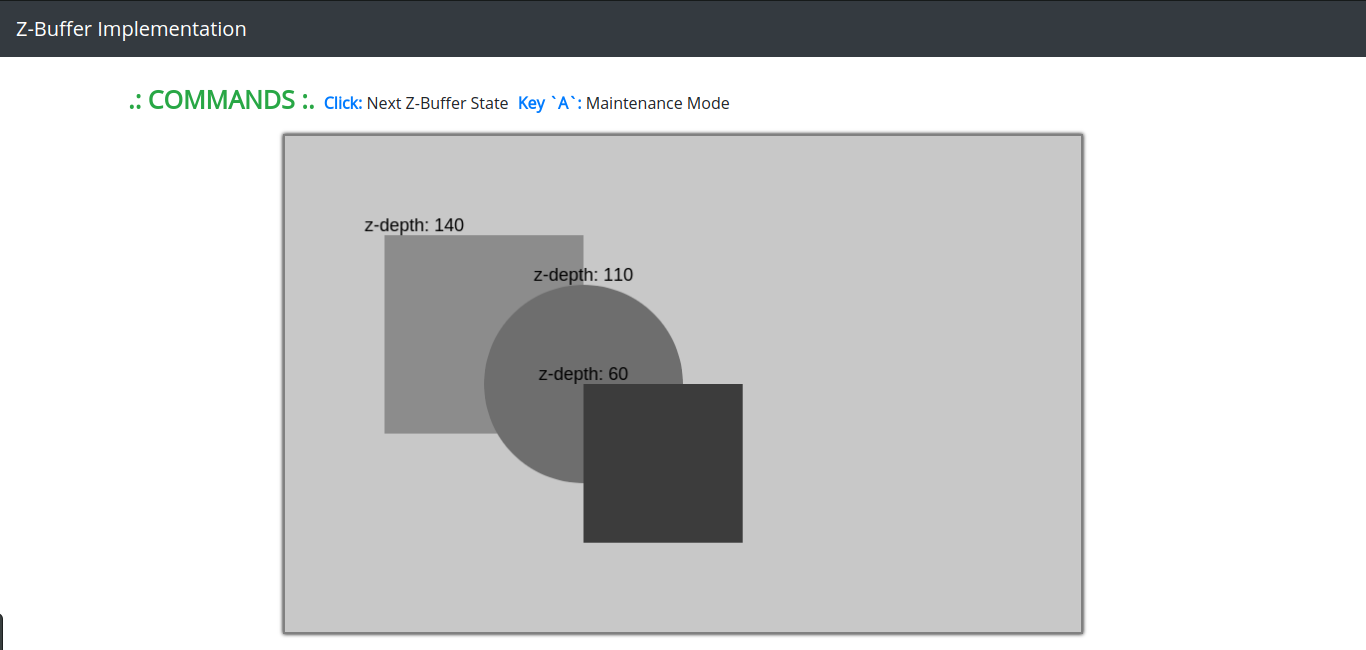
After implementing the z-buffer algorithm in Javacript Library P5.js. Two images were generated, the first one, the image in 2D of the representation view of the polygons. The second one, the image of the depth representation using z-buffer.
The above image shows the representation of Z-buffer in grayscale. As darker the polygon is, closer to the viewer is. The Z-buffer algorithm is extremely fast, compared with some ray-tracing algorithms. That is why Rasterization is most common used in Video games image rendering, because it allow games to feel real, allowing at least 30 frames per second rates, depending of the video card adapter.
References
- W.K. Giloi, J.L. Encarnação, W. Straßer. “The Giloi’s School of Computer Graphics”. Computer Graphics 35.
- N. Calvo. Computación Gráfica: El espacio de la imagen. Link
- University of Helsinki. The z-Buffer Algorithm. Link
- Wikipedia. Z-buffering. Link
- D. Rousset. “Tutorial part 4: learning how to write a 3D software engine in C#, TS or JS – Rasterization & Z”. Link